Specification
| Model No | GY180SD-L1000 | GY180SD-L600 |
| Lighting source | LED | |
| Rate power | 10-30W | 50W |
| Input | AC220V/50HZ | |
| Power factor | ≥0.9 | |
| Lamp Luminous Efficiency(lm/w) | ≥100lm/W | |
| Color temperature | 3000K~5700K | |
| Color Rendering Index(Ra) | Ra70 | |
| IP rating | IP65 | |
| Electrical safety level | CLASS I | |
| Working temperature | -40~50℃ | |
| Grille configuration | With grille | Without grille |
| Bracket height adjustment | 60mm | |
| Bracket angle adjustment | ±90° | |
| Recommended installation distance | Continuous installation (center distance 1meter) | 5 meters spacing |
| Surface treatment | Anti-corrosion spray+ anodic oxidation | |
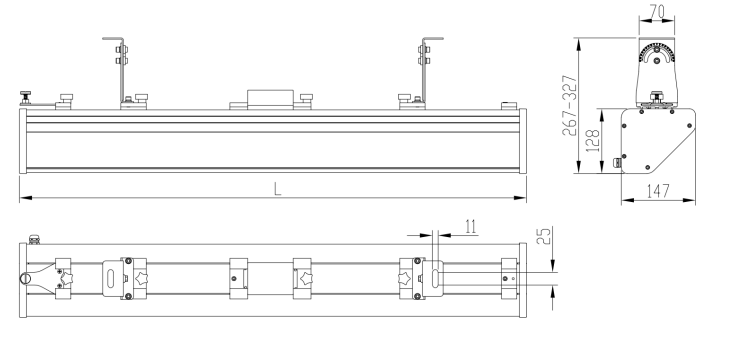
| Dimension | 1000*147*267mm | 600*147*267mm |
| Net weight | 7.3kg | 5.2kg |
| Carton size | 1080*190*465mm | 680*190*465mm |
| Quantity per carton | 2 | |
Feature
1)Appearance design: The lamp is a long strip design with a simple, generous appearance and smooth lines. Unique 45-degree angled out Glossy, chic and innovative.
2) Heat dissipation design: radiator with high thermal conductivity + thick light source substrate, which can effectively improve the heat capacity and speed up the heat dissipation of lamps. It can effectively reduce the temperature of the light source chip and ensure the long service life of the light source.
3) Optical design: The light source of the lamp is illuminated inward, and the light is reflected out through the precisely designed arc-shaped diffuse reflection surface.
The lamps are surface luminous, and the light is soft.
4) Grille design: The light-emitting surface of the lamp is designed with a grille pole, which reduces the vertical light distribution angle of the lamp and makes the light
More exposure to the road. Effectively reduce the glare of lamps and lanterns and provide a comfortable lighting environment.
5) Light-emitting angle: the light-emitting surface of the lamp adopts an inclined design, which is 45 degrees inclined to the road surface, which is more suitable for the roof of the urban tunnel. requirements for installation on both sides of the unit.
6) Continuous light strip: the light-emitting surface of the lamp emits light on the whole surface, and the lamp is installed with a mechanical butt joint to ensure that the lamp is installed. The light-emitting surface of the device forms a continuous and straight light band effect.
7) Light source replacement: The light source components are inserted into the lamp body, and the butt terminals are used for electrical connection between the lamp bodies. Unscrew the end cap .The plug can be extracted and replaced with a new light source assembly.
8) Power supply replacement: The power supply is fixed on the installation slider with a plug-in pole, and the five-star hand screw of the installation slider is loosened. The power supply can be removed and replaced by hand without tools.
9)Installation method: The lamp bracket can be fixed on the top of the lamp or on the back of the lamp. Top for lamps .It can be installed or side-mounted, providing more flexible installation and adjustment methods. Lamp brackets are bolted to the mounting surface.
10) Bracket adjustment: The lamp bracket can be adjusted up and down and corner, up and down can be adjusted 60mm, the corner can be adjusted ±90°, And with an angle adjustment scale indication, to ensure the unity of the angle when the lamps are installed in batches.
11) Control interface: The lamps can reserve control interfaces such as 0-10V, which can realize the dimming control of lamps.
12) Protection class: The protection class of the lamp is IP65, which meets the requirements of outdoor use environment.
13) Green environmental protection: Does not contain harmful elements such as mercury and lead.
Material and structure

| NO | Name | Material | Remark |
| 1 | End cap | Aluminum | |
| 2 | Plug | Copper | The light source module is inside |
| 3 | Luminaire butt joint pole-movable end | ||
| 4 | Grille | Aluminum | |
| 5 | Bracket | Aluminum+ Carbon steel | |
| 6 | Power supply | ||
| 7 | Power fixing slider | Aluminum | |
| 8 | Glass | Transparent tempered glass | |
| 9 | Lamp body | Aluminum | |
| 10 | Luminaire butt joint pole-fix end | Aluminum |
Dimension drawing (mm)
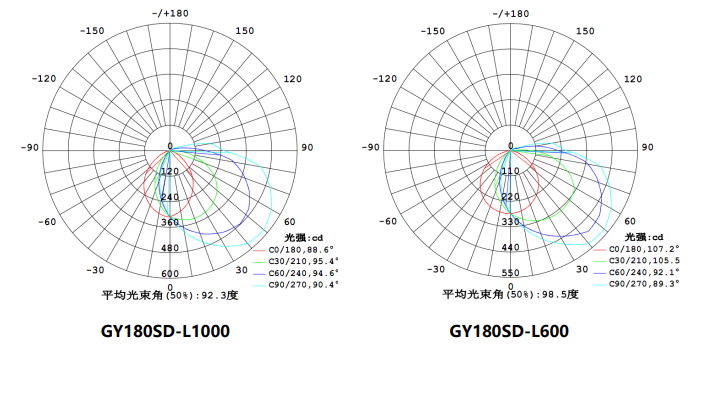
Light distribution scheme
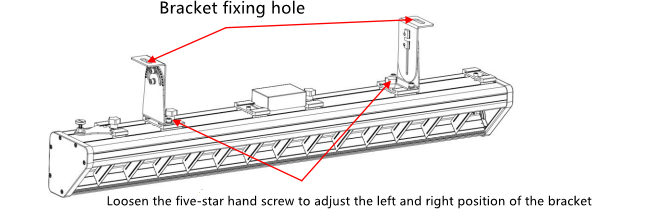
Installation method
Unpacking: Open the packing box, take out the lamps, check whether the lamps are in good condition and whether the accessories are complete.
Drilling and fixing: According to the size of the fixing hole of the lamp bracket, punch the fixing hole at the appropriate position on the installation surface.
Fix the luminaire on the mounting surface with bolts through the fixing holes of the bracket. The left and right positions of the bracket can be adjusted as needed.
Lamp installation adjustment: Loosen the adjustment screw, and adjust the installation height and angle of the lamp as needed. tighten again Adjust the screw to complete the adjustment of the lamp.
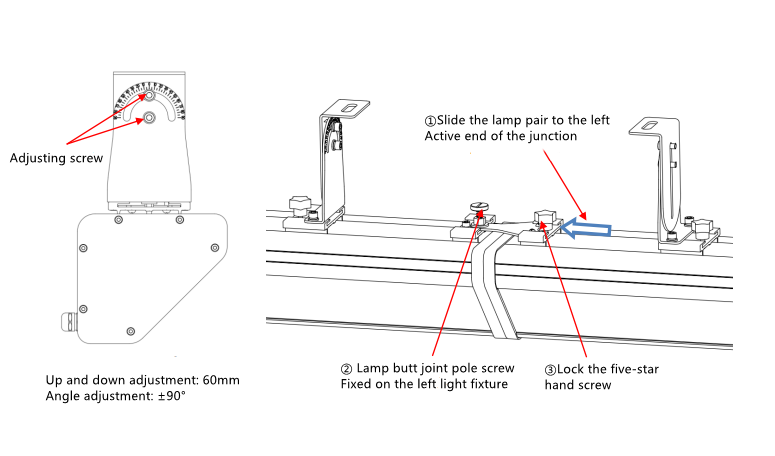
Lamp docking: slide the movable end of the lamp docking pole of the right lamp to the left, and connect the locking screw of the docking pole to the left.
Fixed on the left light fixture. Tighten the five-star thumbscrews of the docking pole to complete the docking of the lamps.
Electrical connection: Distinguish between the power supply input leads of the lamps and the mains, and do a good job of protection.
Brown-L
Blue-N
Green-Yellow-Ground wire

Power supply replacement: Loosen the five-star thumb screw of the power supply fixing slider, move the slider to the right to remove the power supply.
After replacing the new power supply, move the power supply fixing slider back again and lock the five-star thumbscrews to complete the power supply replacement.

Bracket installation position: The lamp bracket can be installed on the top of the lamp or on the back of the lamp.
According to the requirements of the installation environment, customize the installation position of the lamp bracket.
Note: The entire installation process needs to be carried out in the case of power failure, and the power supply can be supplied after all installations are completed and checked.
Application
This product is suitable for fixed lighting in tunnels, underground passages, culverts and other passages.

Post time: Mar-02-2023
